Sunday, February 8, 2009

Hawaii

This is what the weather was like when we left the mainland. Yes. Those are snowflakes on the plane's window.
 

Blue ocean, white sand and green mountains made for beautiful scenery!
 

This was at a scenic point. Looking out at the opposite side of the island from Waikiki.
 

If you follow football, this is the stadium where the Pro Bowl was played this weekend.
 

Pineapple fields. Hard to believe those pineapples can sit on top of the plant to grow so big!
 

800 years ago, royalty came to this place to give birth to their children. Immediately after birth, the chiefs would take the baby away to a safe place to raise until they were grown. The mothers would not see their child again until they were adults. Nowadays, this is a place where families come to give respect for what happened here. They leave tokens on the birthing rocks because they feel this is a sacred spot.
 

Snowcone shop. The line was out the door and around the corner just to get a Matsumoto snowcone! Great on a warm day!
 

I had to go inside a grocery store to see the prices on the food. This was the most crazy price I found!
 

A sunset on North Shore. The surfers would surf until dark.
 

Chinaman's Hat on the other side of the island. So gorgeous!
 

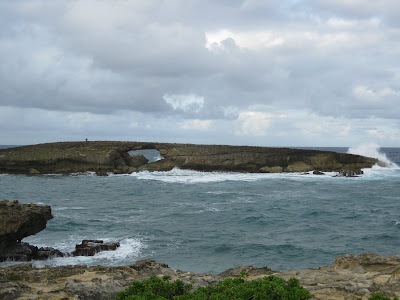
A tsunami came through years ago and blew this hole into this rock in one day. When the ocean is rough the water will come through the hole. I bet that is a site to see!
 

Our hotel. I loved the "no door" concept!


Posted by Picasa

Friday, February 6, 2009

Farmer's Market

Okay. So I didn't quite keep up with the rest of the Sloanies but I can finally say I am finished with my BOM Farmer's Market quilt! Yea for me! Pat Sloan is an incredible quilt artist. Not only does she design quilt patterns and fabric but she also manages a yahoo group of ladies that love her patterns. Look under "free patterns" on Pat's site to find it. This was a quilt she designed last year for us to make. I am so happy that I didn't give up or put it away too long and never finish it. I admit I did have to play catch up with several blocks but it was worth getting it back from the quilter on Wednesday and seeing it all finished! On to the next project!
 

Posted by Picasa

Thursday, February 5, 2009

Hawaii!

My Christmas present to my dh was a trip to Hawaii. We just got back. Here are a few pics of 2 of the 3 fabric shops we stopped at. The first one was more like the shops on the mainland. I bought the pattern for the quilt in the second pic. The other 2 shops had rolls and rolls of Hawaiian fabric for very reasonable prices. Ladies were there buying whole rolls. I didn't even think of asking what they do with it. Fun, fun trip! If I get time, I will post some pics of the island.


Posted by Picasa

Thursday, January 22, 2009

Pressing Sheets

I have been sewing for awhile now and one of the things I love to do is applique. See one of my wallhangings below...
What I just found out is what a "pressing sheet" is and what you use it for. I can't believe no one told me about this little jewel! Cost is not cheap (about $15 but if you have a coupon for JoAnn's or somewhere you can get it cheaper.)
Here's step by step easy directions on how to use it:
1. Cut out your applique pieces that you will be working with.
 

2. Here is the sheet I am using today. Bought at my LQS.
 

3. Another pressing sheet from Fons and Porter that you can buy at JoAnns.
 

4. Peel off the back of your Heat & Bond from your fabric.
 

5. Now the fun part! Place your pressing sheet over your fabric. You will be able to see it quite clearly. If you have a pattern that is sized correctly for your applique, you can place it under your pressing sheet and place your applique pieces in the correct spots. Since my pattern is small, I am just using my block to make sure I place my pieces not too close to the edge of the fabric so I will have a good seam allowance.
 

6. Place your applique pieces onto the pressing sheet how you want them.
 

7. Iron your applique pieces together.
 

8. Let cool and then peel your applique off your pressing sheet. Since it is now one piece, it should stay just how you want it!
 

9 Put the appliqued piece on your fabric and then press with the iron like you would any applique. With it now being just one piece it is so much easier to iron!
 

I wish I would have known about pressing sheets when I was making this quilt a couple of years ago!


Posted by Picasa

Monday, January 19, 2009

Blog of the Week!

Imagine my surprise when I read my inbox today and found a comment from Marilyn saying that she picked my blog to put on her sidebar as "Blog of the Week"! Thanks Marilyn! Check out her blog---she has some great pics of beautiful quilts!

BOM-traditional quilt

I am taking part in a mystery bom at my LQS this year. I tried to do one last year but for me, Saturdays are family days and I am not always in town. I am going to try again this year. The LQS has two blocks to choose from. One is an original applique and the other is traditional piecing. I am making both but doing my own color scheme. Maybe (maybe) the traditional quilt can be for my bed. The applique quilt is a Noah's Ark. I haven't finished that one yet. My dil is going to make that one too and so I am waiting to get together with her in case she needs help. My middle child (daughter) is making the traditional quilt. I am hoping that with all 3 of us working on them this year that it will help us all be at the LQS every 2nd Saturday of each month to pick up our next block. It's really a deal if we can do it! We pay $6 for block 1 and then if we bring it back the next month finished, the next block is free. So. We could have quilts by the end of the year that only cost us $6 to make, minus finishing costs. Not bad, eh?!
 

Posted by Picasa

Friday, January 16, 2009

Purse class

Last night I took a class at my LQS. They are going to be having a monthly purse class this year. January's class was to make "The Angel Bag". You can find the pattern on the sidebar here. My fabric was from Timeless Treasures "Daisy-C". I had never attempted making a bag before so I was glad I went to the class. Now I know how to put in magnetic snaps to close a purse. I also learned how to make a stiffer handle with webbing. All in all, I was quite pleased with the results. I just wished I would have brought my camera...each purse turned out so cute and different!

Here's the treat we got at class. A little purse with chocolate!

Inside of bag. I have to say, I love love LOVE this fabric!

The finished purse. Not sure if I want a fabric flower on it or not.
 

I don't think I showed anyone my Christmas present. The Honey outdid himself this year! I would have never guessed that he would buy this for me AND get me the embroidery module that goes with it too! I am frustrated with the embroidery software since my laptop has Vista and I am having trouble with my computer not recognizing everything is plugged in but I have used Honey's laptop to play with it and I have to admit, I can see this becoming a fun toy to have! I love that man!


Posted by Picasa